Showing posts with label farmhouse table. Show all posts

Thursday, January 23, 2014

Cushions for the Bench

Overwhelmed.......do you ever feel like this?
 That there are so many 'to do' projects in your home that you feel frozen.....not knowing where to start and if you do start you're soon pulled in another direction on another project?  That's been me.......until now! I am forcing myself to focus..... focus on one room at a time until it's done! And focusing on one project in that room until that is done.   So far it's working!   As you may know I'm currently in the process of focusing on re-doing my dining room and more specifically on the farmhouse table bench. If you followed my blog when I lived in the mobile home you might remember this picture.


Mr Magazine and I made the table from an old bed and heart pine planks and the bench from the same heart pine. When we moved into the 1920's house we had to shorten the table and the bench because the dining room was smaller.  Here's the farmhouse table and bench as it looks in that room.


You can't really see the bench in this pic but trust me it's there, and unfortunately it's hard. Yep I actually had a couple of complainers, family members sheesh, they said it was too hard on the rump. So kind person that I am I decided to give them some cush on the tush.


Ahhh much better. I found these at Pier 1 and they were like the perfect size YAY! I think the fabric cushions give this room the softness it needed.


 I could have made some but I felt lazy this week. Plus they were on sale for half off!

They didn't come with any ties so to keep them in place I sewed two inch wide velcro on the bottom of the cushion and the receiving part I stapled on to the bench.  It worked out great! Don't worry about those staples, the bench already has holes and dents so I can take them out and it will look like the holes belong there.


 So I'm considering that project done! On to the next!

Partying at...
Fabulous Creative Friday
Home Sweet Home
Feathered Nest Friday
Creative Things Friday
Furniture Feature Friday
Tweak It Tuesday
Inspire Me Tuesday
The Scoop
Wow Us Wednesday


Friday, January 3, 2014

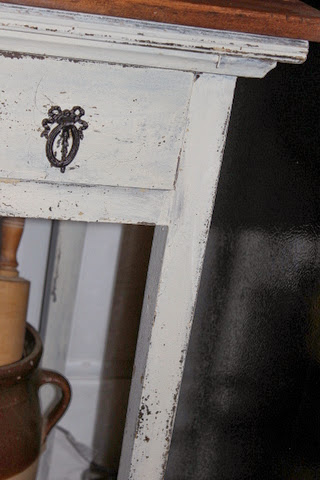
MMS Milk Paint Table


 Hope you all had a great start to the New Year. My resolution for this year is to STOP PROCRASTINATING!!! I've seen bloggers adopting a WORD for the year, well I can't narrow mine down to one, I need three.....it's 'GIT-ER- DONE'.....because I over think everything til I talk myself out of doing anything lol. So I'm just gonna jump in there and get stuff done this year starting with this little table.
 My father in  law used this little table for over 50 years, but it's actually older than that because his wife's parents used it before he did. So it's  80+ years old.


here's the before.......


It obviously has seen a lot of use and this is the very spot where it was used for all those years.


I decided to keep it in the same place in the kitchen but spruce it up a little bit. First I added a new top. I used tongue and groove boards and attached them using my nail gun.
Then I sanded, beat it up a bit with a screw driver, a hammer and a sharp pick to make it look old. Then I stained it with Early American Minwax Stain.


Next I had to decide what to do with the bottom part. I didn't know if I wanted to use Milk Paint or Chalk Paint, I ultimately decided to use MMS milk paint in Linen because I wanted the chippiness.


Here's the final look, I reused the same pulls, I love those pulls, they're little drop pulls with bows. They are original to the table but they never stood out before due to the dark color of the table.

And it has the perfect amount of chippiness, thanks Miss Mustard Seed!


I love how it turned out. It's so handy in this spot, I keep dish towels and pot holders in the drawer.
So that's one project down, now on to the next!

Partying at...
Inspire Me Tuesday
Tweak It Tuesday
Wow Us Wednesday
Be Inspired
The Scoop
Power Of Paint Party
Fabulously Creative Friday
Creative Things Thursday
Feathered Nest Friday
Furniture Feature Friday


Sunday, March 3, 2013

A Table Got In The Way

Well I was hoping to post some pics of the mirror I have been working on.
But we got an order for a Farmhouse Table so the mirror got put on hold. 
After we made our Heart Pine Farmhouse Table

 we got a couple of orders for tables just by word of mouth, woo hoo!
Here's the one we just finished.


We have decided to start making them on a regular basis and sell them. This one turned out so pretty! I love the lighter stained top and I painted and recovered the chairs.

 It's an eight foot table and bench with four chairs. I really stress over the process, I don't know why. My hubs says it's because I'm a perfectionist, not a fun or good thing to be. 
So anyway it will probably be another two weeks before the mirror gets done because I'm taking a trip to California. My grandson is graduating from Marine Corp Boot Camp, Hoo rah!
Take Care, Teresa

Sunday, February 17, 2013

A Bench for the Farmhouse Table

If you've been following along you know my hubs and I made a farmhouse table recently. I had bought six chairs already at GW but still needed some more seating. We wanted to seat 10 at the table. So the solution was to build a bench. We still had one heart pine board left so we were able to use it for the bench. Here's the result.


The chairs will be getting white seat covers.


The ends have too much white showing in my opinion so I'll be adding little furniture appliques in the future.


Teresa
Sharing at.....
Brenda's Tweak It Tuesday
Kims Wow Us Wednesday

Saturday, February 9, 2013

Farmhouse Table Pt 3 Done!

I heart my Heart Pine Table


Remember where I started?
I found this headboard with a footboard and thought we could make the legs for the table from the bedposts.

If you've been following along with the making of my farmhouse table you'll finally see the end product!
If you missed any of my posts you can find Part 1 HERE and Part 2 HERE
So after attaching the legs to the apron we reinforced everything with cross members and gussets.


 This table is getting pretty heavy at this point. But wait til you see what we are using for the top!

 This is 200+ year old Heart Pine that had been reclaimed from 2 foot by 16 foot beams from an old barn. Old Heart Pine is just something you can't get anymore unless it's reclaimed. Sadly they just don't let the trees grow that old before chopping them down. It can only be gotten from the very center of the tree that has grown for at least 100 years to get that grain pattern. So my husband and I feel very blessed to have obtained this wood for our 'forever table'. Just look at that beautiful grain.


I took this picture from the reclaimed wood mill where we got the boards. You can see the white paint from where the beams were painted. We had to look through many boards to choose ones we felt would be good for our table then they planed them for us. Yes there are some knot holes, yes there are worm holes and old nail holes, but that's exactly what we wanted!


 Here are the boards laying on the frame. My husband cut them down to 8 feet by 10 1/2 inches and routed the edges all around . The table ends up being 8 feet long x 42 inches wide  x 30 inches high perfect to seat 10 people!


You can see in this pic that the boards are not attached yet, just laid on so I could show you.


Just look at those curvy legs! No one would ever guess they used to be part of an old antique bed. I painted the apron with MissMustardSeeds Milk Paint but I decided against painting the legs white for now and just painted the apron. I stained the legs and kind of liked the way they turned out, like they had  been around for years, which they actually have been, at least 75 years..


I plan on using Minwax Antique Oil Finish over the stain to finish the top , Once that is on it will really bring out the beauty of the wood even more. I don't want a shiny poly finish instead I want a low luster antique look to it. The top is not attached yet (that's why the boards don't look totally level), hubs can't do it until Monday.


This table now weighs a ton I can't even lift one end using all my strength lol. We're going to have four chairs on one long side, one on each end and a bench on the other long side.


This is what the table looks like after I stained it with Early American Minwax Stain. we routed the center edges of the boards too so as not to have the appearance of a completely flat top with one board running into the next if you know what I'm trying to say. I have more chairs just haven't brought them in from the shed yet.  I love how it turned out!


I plan on making a runner for the center and some chair pads. I think I might use this small runner til I get that made.

From this......

To This.......


UPDATE A Bench for the Farmhouse Table click HERE

 Not bad eh?
Have a great weekend!

Monday, February 4, 2013

Making A Farmhouse Table Part 2

We are making good progress on our Farmhouse Table, you can see Part 1  here.
Here's a pic of the legs we cut from a headboard and foot board.
We cut the end balls off and the flat part will now be the bottom of the leg.


One of the legs before painting. The legs were cut to 29 inches. There were areas to fill with wood putty where it was attached to the head and foot boards.


We used corner braces to attach the legs to the apron.


View from the other side. 


So here are the legs attached to the apron. I love how chunky the legs are, they measure 4 inches wide at the tops. The side rails are 80 inches by 3 1/2 inches wide. The end rails are 28 inches by 3 1/2 inches. There are a lot of things to think about when you're making a table, will there be enough room for the chairs, comfortable table height, apron width so as not to squish your thighs when sitting down, hoping you don't eat so much that your thighs grow thereby thwarting your carefully measured boards. Yep all sorts of things to think about.


We will be adding cross members and gussets tomorrow. This is going to be one heavy and sturdy table, that's why we are assembling it inside the house. See those chairs behind the table? I picked up six of them at Goodwill for $100, they'll be used with the farmhouse table after some sprucing up. I'll be painting the legs and apron tomorrow on Part 3.
Update....Part 3 HERE

Blessings,

LinkWithin

Related Posts Plugin for WordPress, Blogger...